One of the standout features of an MT Solar system is its simplified approach to shipping and assembling rails.
In this article, we’re diving into the nuances of our racking system and offering insights into the design and installation of Tamarack rails. Whether you’re a seasoned installer or new to the field, this comprehensive guide promises to equip you with the knowledge and tools you need to maximize your solar installations, ensuring a seamless and successful project.
We’ll walk you through things like:
- Tips for rail assembly
- Ensuring effective bonding
- Integrating inverters and rapid shutdown devices
- Field modifications
- Compatibility of MT Solar mounts with other rail systems
How to Use String Lines for Alignment
For professional solar installers, a string line is an essential tool for ensuring that all rails are straight and aligned. This precision is particularly important over longer distances, where even a minor misalignment can lead to significant issues at the end of the array. Ensuring that rails are aligned from the start is critical for the smooth attachment of modules and the overall aesthetic and functional integrity of the installation.
Efficient Clamping and Mounting
Tamarack rails clamp from the bottom with a snap-in rail adapter, a method that differs from some competitors who may clamp from the side. This bottom clamping approach simplifies the installation process, allowing for a more streamlined and efficient assembly.
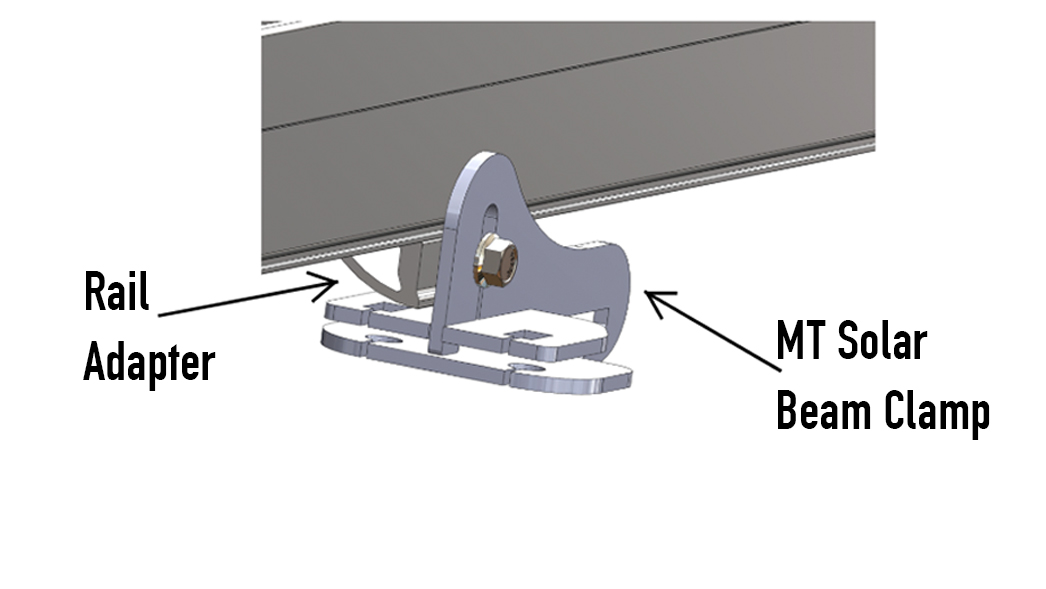
Rail mounting is simple and easy. The Rail Adapter clamps to the two feet on the bottom of the rail. There is never any drilling.
Structural Splicing for Enhanced Flexibility
A key advantage of this racking system is its structural splicing. Unlike other systems where the splice’s position is crucial due to load-bearing considerations, the Tamarack rail allows for a structural splice that can be placed anywhere along the rail. This flexibility is a significant boon for installers, as it allows for custom rail lengths and easier adjustments on-site.
Spread Clamps for Added Stability
For larger installations, particularly those with five modules or taller, we employ what is known as a spread clamp. This component, a piece of angle iron with multiple attachment points, ensures that the rail does not span over four feet without two attachments. This design meets and exceeds the specifications for Tamarack’s rails and most competitive products, ensuring a stable and secure installation.
Ensuring Effective Bonding in Solar Rail Assembly
Integrated Bonding in Module Clamps
At MT Solar, our approach to bonding is integrated directly into our Tamarack module clamps. These clamps, which secure the solar module to the rail, feature a bonding mechanism within the cap itself. This design simplifies the installation process, making it more efficient and less prone to errors.
Tamarack 50/50 clamp works between module or on the end.
Effective Bonding Through Sharp Pins
The bonding process is facilitated by two sharp pins within the clamp. These pins are designed to pierce the coating on the solar panel, establishing a bonding connection that transfers throughout the entire rail and the solar array. This method ensures a secure and effective bonding process, crucial for the overall integrity of the solar installation.
Dual-Function Clamps for Versatility
A unique feature of the Tamarack rail system is the use of the same clamp for both mid and end clamping. This dual-function design eliminates the need for separate purchases or applications of different clamps, streamlining the installation process and reducing inventory complexities.
Integration of Inverters and Rapid Shutdown Devices
Certification and Compliance
All rails, including Tamarack, must meet specific grounding requirements, which are essential for the integration of inverters and rapid shutdown devices. Tamarack rails comply with these requirements, as evidenced by their extensive documentation and certifications. This compliance is crucial for installers to ensure that their installations meet the necessary safety standards.
Microinverter Kit: You’ll need to order these separately with your mount
Inverter Installation
For optimal integration of micro-inverters, optimizers, and rapid shutdown devices, we recommend following the instructions that come with your device.
Ordering and Compatibility
When ordering a pole mount through us, you will need to order the same number of microinverter kits as there are modules in the array. These kits are available on our website as an add-on. It’s important to note that these kits are specific to Tamarack rails and are not universally compatible with other rail systems. This specificity ensures that the components work seamlessly with the Tamarack rail system.
Efficiency in Rail Lengths
Our approach to rail lengths further simplifies the installation process. The rails are supplied in 85-inch lengths, with additional spliced lengths pre-cut, eliminating the need for onsite rail cutting. This pre-sizing of rails streamlines the installation process, making it more efficient and reducing the potential for errors.
Integration Process
Grounding Lug
The integration process involves using a low-profile grounding lug to attach microinverters, optimizers, or rapid shutdown devices to the rail. Before placing the clamp that holds the module, you can attach the device to the rail using this lug.
Field Modifications: Cutting Rails in Solar Installations
While Tamarack rails offer a solution that minimizes the need for field modifications, understanding how to effectively cut rails in the field remains a valuable skill for solar installers. Here are some insights and tips for those rare occasions when cutting rails on-site is necessary.
Choosing the Right Tools
- Portable Band Saw: For a precise and clean cut, a portable band saw is the recommended tool. It offers accuracy and ease of use, making it ideal for cutting rails to the desired length.
- Sawzall: Before the advent of more specialized tools, a sawzall was commonly used. While it may not provide as fine a cut as a band saw, it can still be effective for quick modifications.
Best Practices for Field Cutting
If cutting is necessary, here are some best practices to ensure a smooth process:
- Measure Twice, Cut Once: Always double-check measurements before cutting to ensure accuracy.
- Secure the Rails: Properly secure the rails before cutting to prevent movement and ensure a straight cut.
- Safety First: Always prioritize safety by wearing protective gear and following the tool’s safety guidelines.
Compatibility of MT Solar Mounts with Other Rail Systems
Other Rail Manufacturers
Compatibility between different components is crucial for ensuring a successful installation. While we highly recommend them, and MT Solar mounts are designed to work seamlessly with Tamarack rails, understanding the compatibility with other rail systems is essential for installers.
We maintain a stock of Tamarack rails that are ready for use, ensuring they are in optimal condition without any damage. This availability is a significant advantage for installers who need reliable and high-quality rails promptly. However, our mounts are also compatible with other rail systems, offering flexibility for installers who might prefer or require alternative options.
Considerations for Rail Selection
- Different Grades of Rails: It’s important to understand that all rail companies offer different grades of rails, varying in the thickness of the aluminum and the height profile. These variations are designed to accommodate different load requirements and installation environments.
- Selecting the Appropriate Grade: For installations involving MT Solar mounts, it is crucial to use the heaviest grade rail available from other manufacturers, typically denoted as “Heavy Duty”. This is because MT Solar mounts are designed to handle wind loads on both sides, unlike traditional roof-mounted solar racks.
- Avoiding Roof Rails: We strongly advise against using roof rails on our mounts. Roof rails are typically designed for installations with the support of a roof structure behind them, which is not the case with MT Solar mounts. Using roof rails on MT Solar mounts could potentially void warranties and compromise the integrity of the installation.
- Ensuring Wind and Snow Load Capacity: When selecting rails from other manufacturers, it is essential to ensure that they can withstand the wind and snow loads applicable to the installation site. This consideration is especially crucial for MT Solar mounts, which are exposed to environmental loads from all directions.
- Manufacturer Compatibility: We maintain a friendly relationship with other major rail manufacturers, ensuring compatibility with our mounts. However, installers must still exercise due diligence in selecting the appropriate rail grade to match MT Solar’s specifications.
Getting Started with MT Solar Pole Mounts
Are you a solar installer? Ready to price out your next project?
Start with our pricing configurator and see if an MT Solar pole mount is a fit for your customer.