How To Order an MT Solar Mount
Every MT Solar Mount is made to order based on site-specific variables. Since solar mounts and installations need to account for these variables, we want to show you how to order an MT Solar mount that meets every one of your requirements. From there, our goal is to ensure your expectations are surpassed.
Follow these steps to take your project from a concept to a complete mount that’s ready for installation.
1)
Create a Project
2)
Create a Design using the AutoDesigner
3)
Review and Refine Your Design
4)
Select Your Add-Ons
5)
Get a Quote and Submit Your Order
What You Need Before You Get Started
To fit an MT Solar mount to your needs, you’ll want to have these details ready:
- The address of your installation site.
- Your PV module’s dimensions in inches (length and width) and the total number of modules you’ll use in your solar array.
- Access to the MT Solar Project Portal. If you haven’t yet set up a login, follow these steps:
- Select Project Portal from the upper navigation menu.
- Enter your email and choose a password.
- Check your inbox to verify the Project Portal account set up.
1. Create a Project with the MT Solar Project Portal
The Project Portal gives you everything you need to order an MT Solar mount, including a complete design, calculation packet, and quote. The Project Portal will also let you organize everything you need, collaborate with your team, get assistance if needed, and keep track of the entire process.
Choose to Create or Request a Design
From the Project Portal dashboard, you can start a new project or have our team configure a design for you with a Design Request. Design requests are available for a nominal charge. Designs are typically completed between three and five business days. For this option, complete the form with your information and submit.
Whether you request a design or create one yourself, you can use the Get Help with Your Project button in the upper right to get assistance at any stage of your project.
Staying Organized in the Project Portal

Because everything in the Project Portal is organized by location, it’s best to think of a project as site-based rather than mount-based. You can create and edit multiple mount designs within a single project. This approach also streamlines collaboration with team members you invite to the Project Portal.
Create a New Project
To start building a design yourself, click on the New Project button in the upper left of the Project Portal dashboard. Enter a unique name, choose the project type, and add a brief description of the project. You’ll want to choose something clear and easy to identify.
Once you’ve completed the Name and Description fields, hit the Create Project button.
Enter the Installation Site Details
Provide the installation site address. You may also want to specify the shipping and billing address, but these details can be completed later.
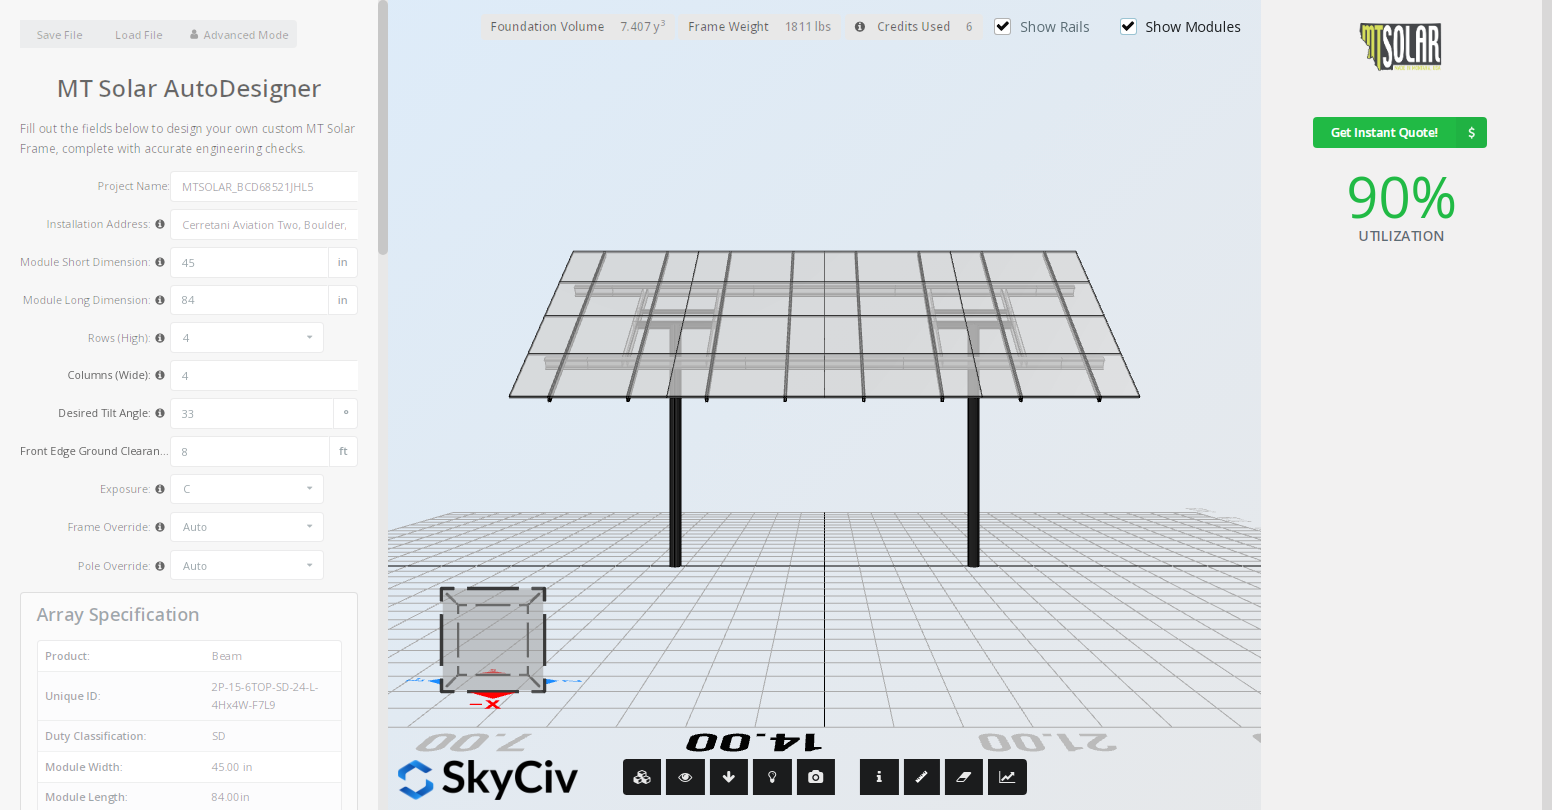
2. Design a Mount Using the Solar Mount AutoDesigner
Once you have the installation address entered, click on the Create Design for this Site Address button in the lower left, under the Designs menu tab in the lower portion of the Project Portal. This will open the Solar Mount AutoDesigner in a separate window.
Start by selecting your project’s country/continent.
Next, enter your design specifics into the applicable fields, including the dimensions of your PV modules, the array’s number of rows and columns, the minimum ground clearance, and other details, such as the foundation type. Make sure you also specify a design name.

As you design the mount, you’ll see the layout reflect these specs. Use your cursor to rotate and zoom in and out on the mount layout across a 3D perspective.
If you need to pause the design process for any reason, you can save your design using the Save File option in the top of the AutoDesigner. This will automatically download a .json file of your design that you can upload to the AutoDesigner when you are ready to continue designing your mount.
When you’ve finished entering your details, click the Run Design button in the lower left. The AutoDesigner will perform a series of engineering checks that pair your mount’s configuration with environmental conditions affecting your location.
The system will ask you to confirm your design’s Wind Speed and Snow Pressure load capacities. If you need to change the system’s recommended wind and snow loads, close the pop-up and use the Overrides option.
After wind and snow loads have been confirmed, click on the Configure and Price button to finish the process and get a quote. This will prompt the AutoDesigner to run its final calculations, which may take up to 30 seconds.
Once the calculations are done, you’ll get a pop-up indicating that your design is complete. You should see it appear under the Designs tab in the Project Portal within a few seconds or after a page refresh. You can now exit the AutoDesigner.
3. Review Your Mount Design
Now that you have your design, you can review its calculation packet, construction drawing, and other details in the PDF output by the AutoDesigner. You can access this file by clicking on the paperclip icon in the PDF column of the Designs tab.
You can use the options in the”Actions” menu to help your review process.
- The “Iterate” option will create a copy of the design that you can rework in the AutoDesigner.
- The “View” option will show you a 3D rendering, CAD, and map view of your design, along with the SKU and weight of the design.
- The “Optimize” option will send your mount to our design team. For a nominal cost, they will perform an expert analysis and make any applicable improvements to maximize the efficiency and performance of your mount.
- The “PE Stamps” option will submit your design for a professional engineer’s stamp in the state where your design will be installed. This service is available for all 50 US states.
- The “Favorite” option will mark your design with a star to help it stand out as a favorite or priority among other versions.
- The “Delete” option will remove the design from the project.
Should You Optimize a Mount Design?
Optimizing your mount design ensures the best efficiency and performance. Our expert design team will review the project you created in the AutoDesigner and look for potential design improvements based on your project requirements. This helps streamline the process of getting a professional engineer’s stamp and ensures that you’ll pass any permitting or design review with ease. For a small fee and a short turnaround, you can save long-term costs and get a mount that’s just right for the location and output goals.
4. Select Your Add-Ons
Project add-ons include the rails, installation tools, and accessories you’ll need for your order. You can browse and get a separate quote on add-ons by clicking on the + Order Addon button in the upper right of the dashboard. You can also select and include them with your mount order when you’re ready to get a quote on your design.
Some add-ons will be required to complete an MT Solar mount installation, while others are optional. You can also contact us if you have questions about what you’ll need for your project.
Essential Add-Ons |
Optional Add-Ons |
|---|---|
| Rail Parts – MT Solar uses Tamarack 3.1 rails as a standard. You can select the rail parts you’ll need as order add-ons, but if you have an alternative kit that you prefer to use, our mounts are fully compatible with other rails. | Performance Suspension Kit – This mount enhancement absorbs force and helps stabilize the array against strong winds. It also makes tilt adjustments smoother. This kit can be added during assembly or after the installation is complete. |
| Chain Hoist and Lift Bracket – One chain hoist and one lift bracket with safety chain are needed for every pole in a mount’s design. These parts are used to raise the mount during installation. If you’ve purchased them previously, you can reuse them for other mount installations. We also provide a rental option. | Tamarack Wire Management Clips – Wire management clips are not required for installation, but they help keep wires tidy during equipment bonding and grounding. These clips are only compatible with Tamarack rails. |
| Micro-Inverter Adaptor – If you are using Tamarack rails, you’ll need a micro-inverter adaptor for every inverter, optimizer, or automatic shutdown device to be incorporated into your mount. | Tilt Angle Indicator – Tilt angle indicators provide a clear visual indication of your mount’s angle, making it easy to keep track of adjustments. They’re especially helpful for making precise tilt adjustments on multipole mounts. We recommend adding one to every tilt adjuster/pole on a mount. |
5. Get a Quote and Submit Your Order
Once you’ve finalized your mount design, you can get a quote by selecting the design under the Quotes tab and clicking the Get Quote button.
Choose the mount quantity, followed by any add-ons you require, and confirm your order details.
After the quote is created, you’ll see the quote in the Quotes tab with the option to download a PDF or send the quote to the email associated with your Project Portal account. When you’re ready to approve, click the Accept button in the Project Portal.
You’ll then be able to enter your payment details. Once you submit the minimum deposit required for manufacturing, we’ll move to the next step of fulfilling your order.
The order invoice will be available under the Invoices tab, where you can check the remaining amount due, due date, payment status, and other details.
The Project Portal will show the progress of your order, from the prepare to build phase, through manufacturing, to your order’s shipment. You can keep track of the current lead time in the upper part of the Project Portal dashboard.
What Happens Next?
While we’re manufacturing your mount, you’ll want to continue planning your project so you can hit the ground running when it’s time for the installation.
Use this post-order checklist to keep your project moving forward.
- Purchase your PV modules if you haven’t already.
- Identify the pole size(s) you’ll need for your mount and connect with a local source for steel pole(s).
- Check the size and shape of your mount foundation(s) and get estimates for cement supply, mixing, and pouring.
- Contract with excavation services for digging the mount’s foundation(s) and pipe setting.
- Contract with electrician services for the mount’s equipment bonding and grounding.
- Check out our guides and videos to see the foundation preparation and mount installation processes.